
I just finished my first and what will probably be my most extreme internal routing project. I'm going to do it again and incorporate the good ideas and excorporate the dumb ones and make a really cool internal setup. Did a couple of things to make this work:
1) Bruce gordon/high end Time frame non or less adjustable seat post setup that raises the binder bolt up and uses a long seat tube. No seat tube passing through the seat cluster so i could route cable through there
2) used 1/8" stainless tubing with an ID of .020 (I think, whatever it was it was big enough for brake and der. cable alike without too much drag. works well) and fully routed the inside of the bike.
Like I said, some of the ideas are cool and some are forehead smacking dumb. This was my first road bike build (my fifth frame, all the rest were track and didn't need braze ons) and my first time fillet brazing a frame.

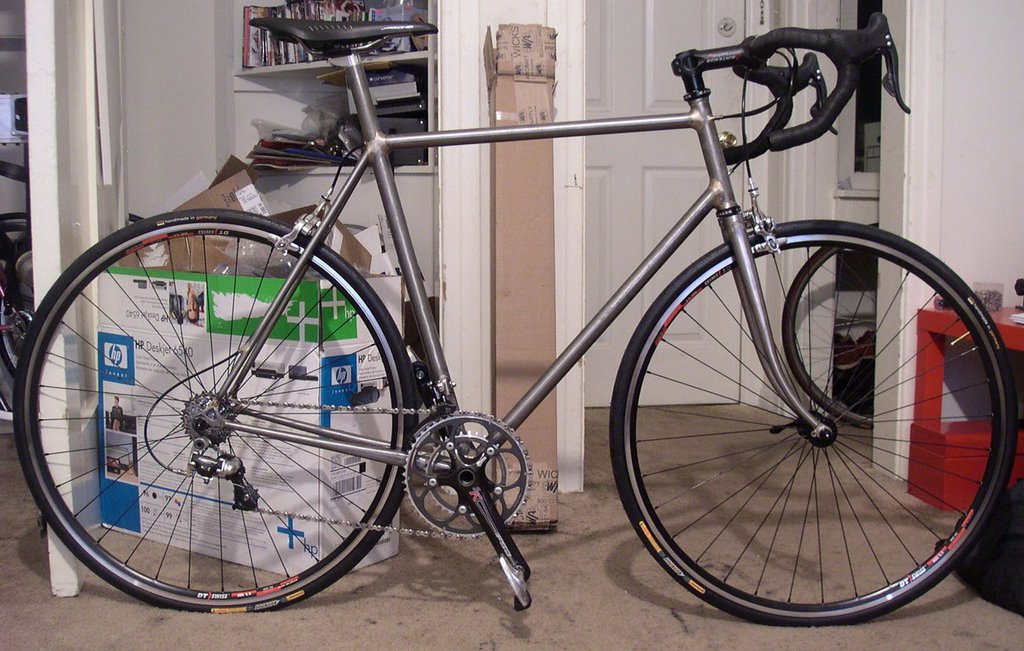
There she is. One painted with the routing fixed and one raw with it still messed up.

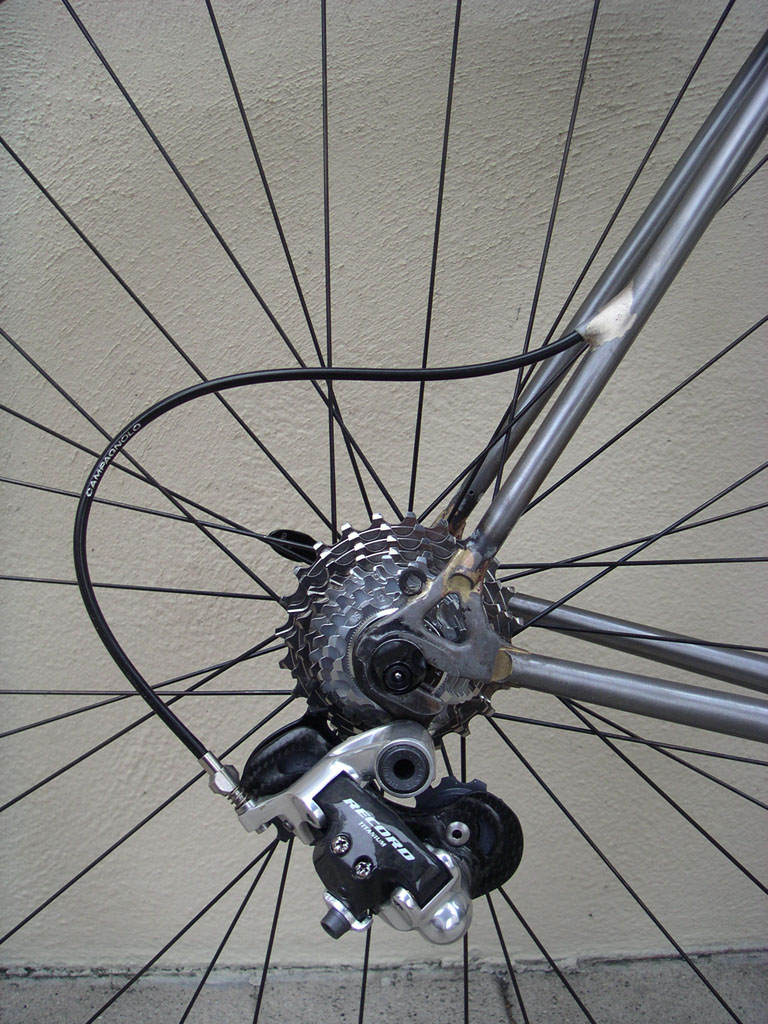
The rear derailleur cable routing goes through the top tube, goes through the seat tube, into the right seatstay and pops out above the rear derailleur about 2/3's of the way down the seatstay. Once cable is routed through and the chain is on the der. will be pulled down a bit and the housing won't be so long and loopy looking.

Rear brake goes through the top tube along side the rear derailleur housing but pops out of the rear of the seattube right behind where the top tube ends. I wanted it to pop out the seatstay like the rear derailleur routing did but it wouldn't leave enough cable to allow the lengthening of the cable when the brake was applied. Once the cable is routed the brakes will be tighter (they are all the way open now) and the curve in the cable housing in back won't be so pronounced.
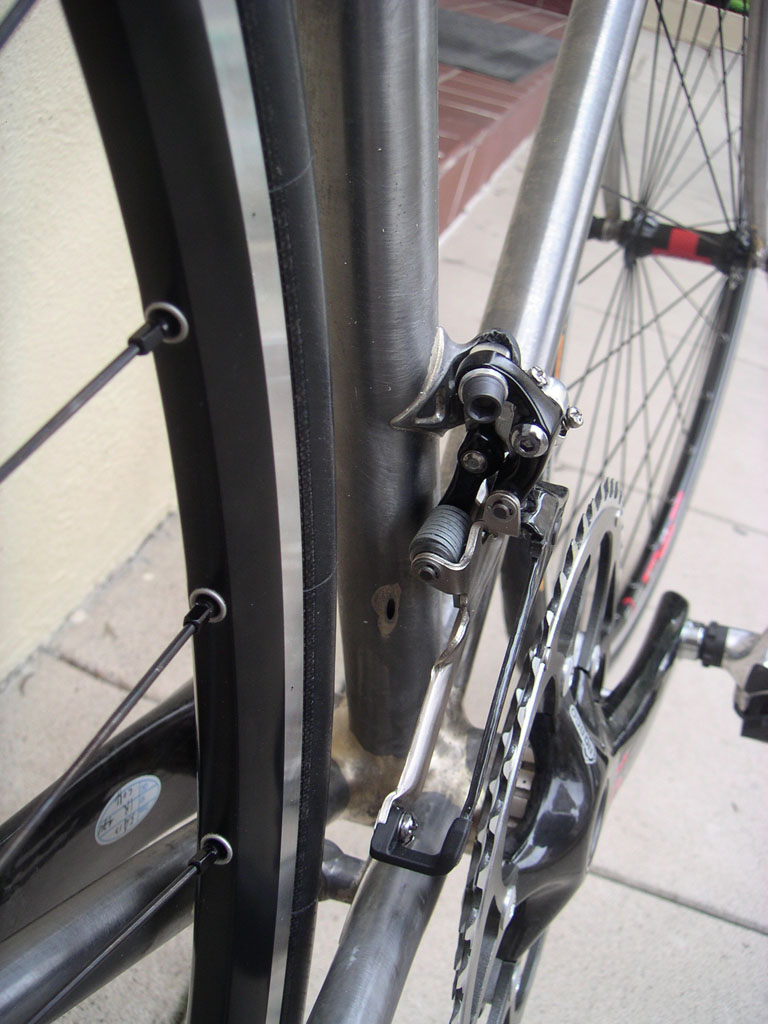

Front derailleur cable routing goes down the down tube, curves around and pops out travelling upward on the seat tube maybe 3 inches below the derailleur bolt. Travels totally internally because the stainless housing bends and travels above where the actual bottom bracket sits in the shell where the seat tube and down tube meet. There is space there to route the housing and the curve is more gentle than winding around the bb shell on the bottom as usual. Sorry no cable running through it to show it better. I will add finished pictures but figured I should jump on this before everyone is so totally over talking about internal routing.

UPDATE: This has been fixed, but I'll include the dumb first way and then show the fix.
All the cables enter through the headtube, slide by the steerer tube, and enter the top tube or down tube already inside them. Internal routing starts at the rear of the headtube flush with the inside of the headtube. That was the dumbest idea. I had to use a derailleur cable for the rear brake cable as normal brake cable was too thick/not flexible enough to move around the head tube. Also, even after two rides there are little notches being rubbed in the steerer tube. I also can't ride no handed unless I'm going pretty fast as the steering is too stiff and doesn't correct itself easily enough. I'll have to try and fix this by pulling the internal routing out to the sides of the top tube if I want to keep riding this bike. Would have been the same effect to have barrel adjusters on the side of the headtube and have the cables enter close to the headtube on the bottom side of the top tube and downtube. Would have looked almost the same without a ton of hassle and you'd be able to use a carbon fork. I planned on using gore-tex or teflon cables to ease the drag and possible wear from rubbing factor on the steerer tube, but still, awful idea.


Here is the fix. I had to drill holes in the sides of the tubes, drill through the internal routing to separate it from the head tube (it was brazed where it went through the headtube), and then fish the length out of the sides of the top tube. At that point I modified some water bottle bosses to receive the housing and drilled a tiny hole in the closed end to accept the 1/8" stainless internal housing. Once I passed the stainless through the water bottle bosses I was able to lay them over in the frame how you would normally do internal routing and braze them in place. Only problem was that I wasn't able to braze the stainless to the water bottle bosses because that was inside the frame. The problem worked itself out when I drilled into the water bottle bosses to get rid of the excess stainless housing. When I had removed the excess stainless the end of it looked like a rivet does after it's been set. The end was widened and would not pull through the boss.
The 4 plates you see brazed on the front were quick patches for the holes that were in the head tube after I took the routing pieces off. I decided to leave it really rough and I actually like the results. A cool headbadge.

Here is the seat tube with brazed in internal housing for the rear brake and rear derailleur cables.
So real quick, the order of operations of the tricky stuff:
1) From the pics you can see that I brazed the two s.s. routings to the seat tube first after I had gotten their bends correct.
2) Once seat tube was in jig I brazed the front der. routing to the seat tube where it comes out.
3) Then I slid on the top tube and down tube on and if you route it like it should be done your cables will pop out towards the front of those tubes. I'll skip the excessive complications of routing through the headtube like I did.
4) Put the seatstays on and made sure it popped out the bottom where I wanted it.
5) I tacked the whole thing at once and brazed the whole thing in one shot afterwords. No front triangle then rear triangle. The only part I had assembled already was the chainstay/dropout/seatstay assembly. Then did all the rest.